Jeep Liberty: Driver Memory Seat — If Equipped
This feature allows the driver to store up to two different memory profiles, for easy recall through a memory switch. Each memory profile contains desired position settings for the driver seat and side mirrors and a set of desired radio station presets.
The memory switch is located on the instrument panel to the left of the steering column. The switch contains a S (SET) button to activate the memory save function. It also contains a rocker switch labeled with the number (1) and the number (2). The rocker switch allows the driver to recall either of the two pre-programmed memory profiles by pressing the appropriate side of the switch.
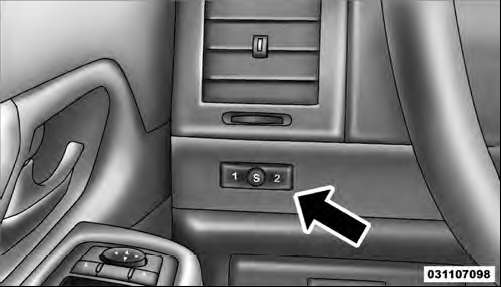
Driver Memory Switch
Programming The Memory Feature
To create a new memory profile, perform the following:
NOTE: Saving a new memory profile will erase an existing profile from memory.
1. Turn the ignition ON.
2. Adjust all memory profile settings to desired preferences (i.e., seat, side mirror and radio station presets).
3. Press and release the SET button on the memory switch, then press the side of the rocker switch labeled (1) within five seconds. The Electronic Vehicle Information Center (EVIC), if equipped, will display which memory position is being set.
If desired, a second memory profile can be stored into memory as follows:
1. Turn the ignition ON.
2. Adjust all memory profile settings to desired preferences (i.e., seat, side mirror and radio station presets).
3. Press and release the SET button on the memory switch, then press the side of the rocker switch labeled (2) within five seconds. The EVIC, if equipped, will display which memory position is being set.
NOTE:
• For vehicles equipped with an automatic transmission,
memory profiles can be set without the vehicle in
PARK, but the vehicle must be in PARK to recall a
memory profile.
• For vehicles equipped with a manual transmission, the vehicle speed must be at 0 mph (0 km/h) to recall a memory profile.
• The Recall Memory with Remote Key Unlock feature can be turned on and off through the EVIC, if equipped. Refer to “Electronic Vehicle Information Center (EVIC)/Customer-Programmable Features” in “Understanding Your Instrument Panel” for further information.
Linking And Unlinking The Remote Keyless Entry Transmitter To Memory
Your Remote Keyless Entry (RKE) transmitters can be programmed to recall one of two pre-programmed memory profiles with a press of the UNLOCK button on the RKE transmitter.
To program your RKE transmitters, perform the following:
1. Remove the key from the ignition.
2. Select the desired memory profile 1 or 2.
3. Press and release the SET button on the memory switch, then within five seconds press and release the side of the rocker switch labeled 1 or 2 accordingly.
Memory Profile Set” (1 or 2) will display in the EVIC, if equipped.
4. Press and release the LOCK button on the RKE transmitter within 10 seconds.
NOTE: Your RKE transmitters can be unlinked to the memory setting by pressing the SET button followed by the UNLOCK button on the RKE transmitter in Step 4 above.
Memory Position Recall
NOTE:
• For vehicles equipped with an automatic transmission,
the vehicle must be in PARK to recall memory positions.
If a recall is attempted when the vehicle is not in PARK, a message will display in the EVIC, if equipped.
• For vehicles equipped with a manual transmission, the vehicle speed must be at 0 mph (0 km/h) to recall memory positions. If a recall is attempted with the vehicle speed above 0 mph (0 km/h), a message will display in the EVIC, if equipped.
To recall the memory settings for driver one, press MEMORY button number 1 or the UNLOCK button on the RKE transmitter linked to memory position 1.
To recall the memory setting for driver two, press MEMORY button number 2 or the UNLOCK button on the RKE transmitter linked to memory position 2.
A recall can be cancelled by pressing any of the MEMORY buttons (S, 1, or 2) during a recall. When a recall is cancelled, the driver seat will stop moving. A delay of one second will occur before another recall can be selected.
Easy Entry/Exit Seat (Available With Memory Seat Only)
This feature provides automatic driver seat positioning to enhance driver mobility when entering and exiting the vehicle.
The distance the driver seat moves depends on where you have the driver seat positioned when you remove the key from the ignition switch.
• When you remove the key from the ignition switch, the driver seat will move about 2.4 in (60 mm) rearward if the driver’s seat position is greater than or equal to 2.7 in (68 mm) forward of the rear stop. The seat will return to its previously set position when you insert the key into the ignition switch and turn it out of the LOCK position.
• When you remove the key from the ignition switch, the driver seat will move to a position 0.3 in (8 mm) forward of the rear stop if the driver’s seat position is between 0.9 in and 2.7 in (23 mm and 68 mm) forward of the rear stop. The seat will return to its previously set position when you insert the key into the ignition switch and turn it out of the LOCK position.
• The Easy Entry/Easy Exit feature is disabled when the driver’s seat position is less than 0.9 in (23 mm) forward of the rear stop. At this position, there is no benefit to the driver by moving the seat for Easy Exit or Easy Entry.
Each stored memory setting will have an associated Easy Entry and Easy Exit position.
NOTE: The Easy Entry/Easy Exit feature can be turned on or off through the programmable features in the EVIC.
Refer to “Electronic Vehicle Information Center (EVIC)/ Customer-Programmable Features” in “Understanding Your Instrument Panel” for further information.
To Open And Close The Hood Lights
Two latches must be released to open the hood.
1. Pull the hood release lever located under the left side of the instrument panel.
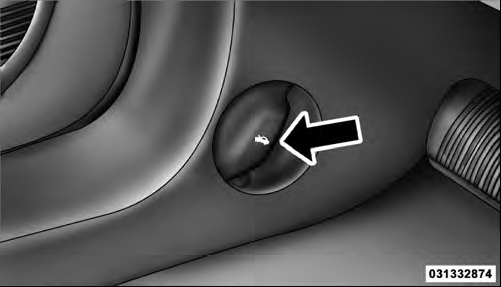
Hood Release
2. Outside of the vehicle, locate the safety latch lever between the grille and hood opening (left of center when facing hood). Push the safety latch lever to the right and then raise the hood.
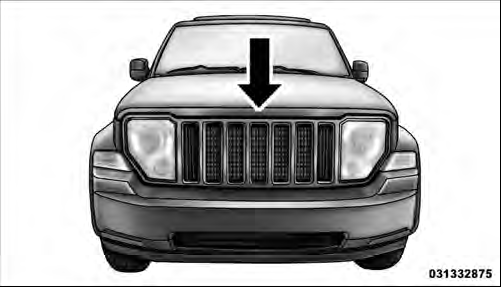
Underhood Safety Latch
Use the hood prop rod to secure the hood in the open position. Place the upper end of the prop rod in the hole on the underside of the hood.
CAUTION!
To prevent possible damage:
• Before closing hood, make sure the hood prop rod is fully seated into its storage retaining clips.
• Lower the hood to approximately 6 in (15.2 cm) above the closed position and drop the hood to latch it.
• Never drive your vehicle unless the hood is fully closed, with both latches engaged.
WARNING!
Be sure the hood is fully latched before driving your
vehicle. If the hood is not fully latched, it could open
when the vehicle is in motion and block your vision.
Failure to follow this warning could result in serious injury or death.
 Seats
Seats
See also:
Emission control system
The emission control system of your vehicle is covered by a written limited warranty.
Please see the warranty information contained in the Warranty & Consumer Information
Manual in your vehicle. Vehicle modifications This vehicle should not b ...
Parking Brake Lever
Parking Brake
Lever (1) To set (2) To release (3) To release
The parking brake lever is located between the seats. To set the parking brake,
hold the brake pedal down and pull the parking brake lever all the way up. To release
the parking bra ...
