Jeep Liberty: Bulb Replacement
Headlamp
1. Open the hood.
2. Reach behind the headlamp housing to access the headlamp bulb lock ring.
3. Firmly grasp the lock ring and rotate it counterclockwise to unlock it.
4. Remove the bulb and connector assembly from the headlamp housing.
5. Disconnect the bulb from the electrical connector and then connect the replacement bulb.
CAUTION!
Do not touch the new bulb with your fingers. Oil
contamination will severely shorten bulb life. If the
bulb comes in contact with any oily surface, clean the
bulb with rubbing alcohol.
6. Install the bulb and connector assembly into the headlamp housing and rotate the lock ring clockwise to lock it in place.
7. Close the hood.
Front Turn Signal And Front Side Marker Lamp
1. Turn the steering wheel all the way to the right to access the left front turn signal or side marker. Turn the steering wheel all the way to the left to access the right front turn signal or side marker.
2. Remove three push-pins from the wheel-well liner.
3. Gently flex the wheel-well liner forward to access the bulb.
4. Rotate the bulb’s socket counterclockwise, and remove the bulb and socket assembly from the housing.
5. Pull the bulb out of the socket and insert the replacement bulb.
6. Install the bulb and socket assembly into the housing, and rotate the socket clockwise to lock it in place.
7. Reposition the wheel-well liner and install the push-pins.
Front Fog Lamp
1. Open the hood.
2. Reach behind the headlamp housing to access the bulb.
3. Rotate the bulb’s socket counterclockwise, and remove the bulb and socket assembly from the fog lamp housing.
4. Pull the bulb out of the socket and insert the replacement bulb.
CAUTION!
Do not touch the new bulb with your fingers. Oil
contamination will severely shorten bulb life. If the
bulb comes in contact with any oily surface, clean the
bulb with rubbing alcohol.
5. Install the bulb and socket assembly into the into the fog lamp housing, and rotate the connector clockwise to lock it in place.
6. Close the hood.
Rear Tail/Stop, Turn Signal, And Back-Up Lamp
1. Open the liftgate.
2. Remove the screws that fasten the taillamp housing to the vehicle.
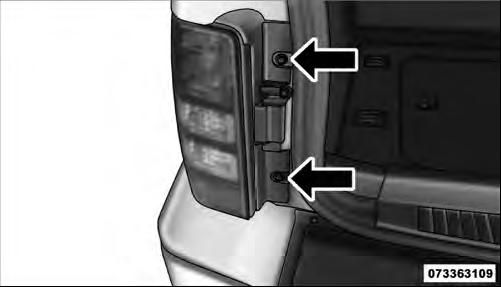
3. Pull the taillamp housing straight back to separate it from the vehicle.
4. Disconnect the electrical connector.
5. Remove the two screws that fasten the back plate to the taillamp housing.
6. Separate the back plate from the taillamp housing.
7. Pull the appropriate bulb(s) out of the back plate and insert the replacement bulb(s).
8. Install the back plate and screws into the taillamp housing.
9. Connect the electrical connector.
10. Install the taillamp housing and screws.
11. Close the liftgate.
Fluid Capacities

 Fuses
Fuses
See also:
Parking brake
Before leaving the vehicle, make sure that the parking
brake is fully applied. Also, be certain to leave the
transmission in PARK.
The parking brake lever is located in the center console.
To apply the parking brake, pull the lever up as firm ...
Steering wheel controls (if equipped)
Radio control features
VOL + (Volume): Press to increase
the volume.
VOL – (Volume): Press to decrease
the volume.
(Seek): Press to select
the previous/next radio station
preset, CD track or satellite radio
channel (if equipped) depending ...
